
IOS-XR: Ansible based LXC deployment
Introduction
The goal of this tutorial to deploy a container (LXC) on XR using an Ansible playbook.
In this tutorial we will use techniques from 2 other tutorials:
IOS-XR: Ansible and Vagrant. enable connectivity between machines and have preinstalled Ansible on devbox instance.
XR Toolbox, Part 2: Bootstrap XR configuration with Vagrant: using the new shell/bash based automation techniques.
The figure below illustrates the basic steps required to launch an lxc container on IOS-XR 6.0+:
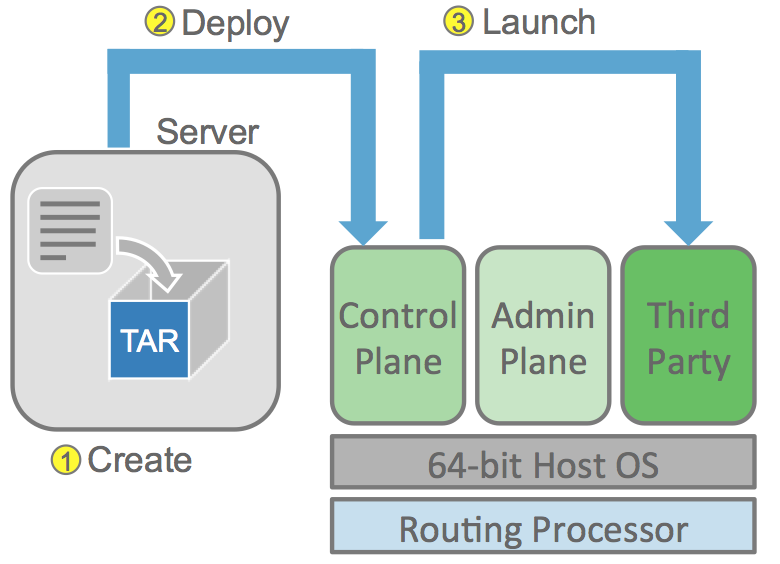
If you’ve gone through the tutorial: XR toolbox, Part 4: Bring your own Container (LXC) App, you would have a fair idea about how to accomplish the manual steps illustrated above. In this tutorial, we want to automate all of these steps using an Ansible Playbook.
Pre-requisite
Vagrant box added for IOS-XRv: If you don’t have it, get it using the steps specified here: XR Toolbox, Part 1: IOS XR Vagrant quick start
Clone the following repository before we start:
cd ~/
git clone https://github.com/ios-xr/vagrant-xrdocs.git
cd  vagrant-xrdocs/ansible-tutorials/app_hosting/
Boot up the environment
We are ready to start, boot the boxes by issuing the vagrant up command
bash$ vagrant up
Bringing machine 'devbox' up with 'virtualbox' provider...
Bringing machine 'rtr' up with 'virtualbox' provider...
==> devbox: Importing base box 'ubuntu/trusty64'...

---------------------------snip output -----------------------
Configure Passwordless Access into XR Linux shell
Let’s copy public part of key from devbox box and allow access without a password. First, connect to the devbox instance and copy its public key to XR via SCP:
vagrant ssh devbox

scp -P 57722 /home/vagrant/.ssh/id_rsa.pub  [email protected]:/home/vagrant/id_rsa_ubuntu.pub
Now add the copied keys to authorized_keys in XR linux
vagrant ssh rtr

cat /home/vagrant/id_rsa_ubuntu.pub >> /home/vagrant/.ssh/authorized_keys
Ansible is ready to work without password.
Create LXC Tar ball in devbox
The user is free to bring their own lxc rootfs tar-ball for deployment on IOS-XR. This section is meant to help a user create a rootfs tar ball from scratch.

All the steps required to create a container rootfs are already covered in detail in the tutorial:
XR toolbox, Part 4: Bring your own Container (LXC) App
Specifically, head over to the following section of the tutorial:
XR toolbox, Part 4…/create-a-container-rootfs At the end of the section, you should have your very own rootfs (xr-lxc-app-rootfs.tar.gz), ready for deployment.
Copy and keep the rootfs tar ball in the /home/vagrant/ directory of your devbox. The Ansible playbook will expect the tar ball in this directory, so make sure an ls -l for the tar ball in /home/vagrant returns something like:
vagrant@vagrant-ubuntu-trusty-64:~$ ls -l /home/vagrant/xr-lxc-app-rootfs.tar.gz
-rw-r--r-- 1 root root 101246853 Jun 20 02:34 /home/vagrant/xr-lxc-app-rootfs.tar.gz
vagrant@vagrant-ubuntu-trusty-64:~$
Great! Ansible will copy this tar ball to XR for you.
Create XML file in devbox
To create a container, we need an xml file with the specifications for the container. Create the following file in the /home/vagrant directory of your devbox :
cat /home/vagrant/xr-lxc-app.xml
<domain type='lxc' xmlns:lxc='http://libvirt.org/schemas/domain/lxc/1.0' >
  <name>xr-lxc-app</name>
  <memory>327680</memory>
  <os>
    <type>exe</type>
    <init>/sbin/init</init>
  </os>
  <lxc:namespace>
    <sharenet type='netns' value='global-vrf'/>
  </lxc:namespace>
  <vcpu>1</vcpu>
  <clock offset='utc'/>
  <on_poweroff>destroy</on_poweroff>
  <on_reboot>restart</on_reboot>
  <on_crash>destroy</on_crash>
  <devices>
    <emulator>/usr/lib64/libvirt/libvirt_lxc</emulator>
    <filesystem type='mount'>
      <source dir='/misc/app_host/xr-lxc-app/'/>
      <target dir='/'/>
    </filesystem>
    <console type='pty'/>
  </devices>
</domain>
Ansible Playbook
Ansible playbook contains 7 tasks:
cat deploy_container.yml
---
- hosts: ss-xr

  tasks:
  - name: Copy XML file
    copy: src=/home/vagrant/xr-lxc-app.xml dest=/home/vagrant/xr-lxc-app.xml owner=vagrant force=no

  - name: Copy rootfs tar ball
    copy: src=/home/vagrant/xr-lxc-app-rootfs.tar.gz dest=/misc/app_host/scratch/xr-lxc-app-rootfs.tar.gz owner=vagrant force=no

  - name: Create rootfs directory
    file: path=/misc/app_host/xr-lxc-app/rootfs state=directory
    become: yes

  - command: tar -zxf /misc/app_host/scratch/xr-lxc-app-rootfs.tar.gz -C /misc/app_host/xr-lxc-app/rootfs
    become: yes
    register: output
    ignore_errors: yes
  - debug: var=output.stdout_lines

  - name: grep
    shell: sudo -i virsh list | grep xr-lxc-app
    args:
      warn: no
    register: container_exist
    ignore_errors: yes
  - debug: var=output.stdout_lines

  - name: virsh create
    shell: sudo -i virsh  create /home/vagrant/xr-lxc-app.xml
    args:
      warn: no
    register: output
    when: " container_exist | failed "
  - debug: var=output.stdout_lines

  - shell: sudo -i virsh list
    args:
      warn: no
    register: output
  - debug: var=output.stdout_lines
Tasks overview:
- Task 1 copies xr-lxc-app.xml to XR ;
- Task 2 copies the xr-lxc-app-rootfs.tar.gz tar ball to XR;
- Task 3 creates folder “xr-lxc-app” at XR, if it does not exist;
- Task 4 unpacks archive with container filesystem (Notice the ignore_errors?- we’re simply avoiding the mknod warnings);
- Task 5 getting list of container and checking if ‘xr-lxc-app’ in grep output. In case of success variable would be changed and Task 6 would be skipped;
- Task 6 creates the container itself using the virsh alias in the XR linux shell (issue command “type virsh” on XR Linux to check. “sudo -i” is important, to load up Aliases for the root user). Triggered only if container not exist;
- Task 7 dumps the virsh list output to show that container is up and running.
Run playbook to deploy LXC
Ansible playbook is ready to use. Issue command in devbox:
ansible-playbook deploy_container.yml
Slow playbook run? XR Gig interfaces are rate limited!
The default ansible setup uses the Gig0/0/0/0 XR interface (connected to eth1 of devbox) to transfer the files over port 57722 (ssh to XR linux). This playbook could be directly used for physical devices as well.
But, bear in mind that the IOS-XR Vagrant instance is rate-limited on its Gig interfaces. So the copy process might be quite slow. To speed up the process we could use the Management interface instead. To do this, determine to which port vagrant forwards port 57722 from XR:
bash-3.2$ vagrant port rtr
The forwarded ports for the machine are listed below. Please note that
these values may differ from values configured in the Vagrantfile if the
provider supports automatic port collision detection and resolution.

 58822 (guest) => 58822 (host)
    22 (guest) => 2223 (host)
    57722 (guest) => 2200 (host)
bash-3.2$
Based on the above output:
- Change the ansible host IP address from 10.1.1.20 (Gig0/0/0/0) address to 10.0.2.2 (gateway/laptop address) in
/home/vagrant/iosxr-ansible/remote/ansible_hostson devbox.- Change the remote_port from 57722 to 2200 (forwarded port determined above, in your case it may be different) in
/home/vagrant/iosxr-ansible/remote/ansible_cfgon devboxThus by using 10.0.2.2:2200 to run the playbook over the management port we significantly reduce the runtime of the playbook.
Verify container is up from XR Linux shell:
xr-vm_node0_RP0_CPU0:/misc/app_host/rootfs$ virsh list
 Id    Name                           State
----------------------------------------------------
 4907  sysadmin                       running
 8087  xr-lxc-app                     running
 12057 default-sdr--1                 running
Container is up and running. It might take some time to be fully up. Give it about 20-30 seconds and you should be able to SSH to it from your laptop:
ssh -p 58822 [email protected]Congratulations!
Leave a Comment