
Application Hosting With Appmgr
Third Party Application Hosting on IOS XR
Application Hosting on IOS-XR allows users to run third-party applications on Cisco routers running IOS-XR software. This article will introduce the Application Hosting features and provide a step-by-step guide to running your own application on XR.
Why use third-party applications?
- You can use a third-party application to extend router capabilities to complement IOS-XR features.
- TPAs help in optimizing the compute resources required in a deployment.
- TPAs can provide operational simplicity by allowing you to use the same CLI tools and programmability tools for managing both IOS-XR and the application.
- By leveraging well-defined programmable interfaces on the router such as gRPC, gNMI, and SL-APIs, TPAs can readily exchange data with the router over secure channels.
- Certain use-cases such as service monitoring and service assurance benefit from having an application that can send and receive traffic on services from the router itself. This provides deeper visibility into network.
App Hosting Components on IOS XR
Now that we have established some use-cases for hosting applications on routers, let’s dive into IOS XR features that can help us in doing so.
Docker on IOS XR: The Docker daemon is packaged with IOS XR software on the base Linux OS. This provides native support for running applications inside docker containers on IOS XR. Docker is the preferred way to run TPAs on IOS XR.
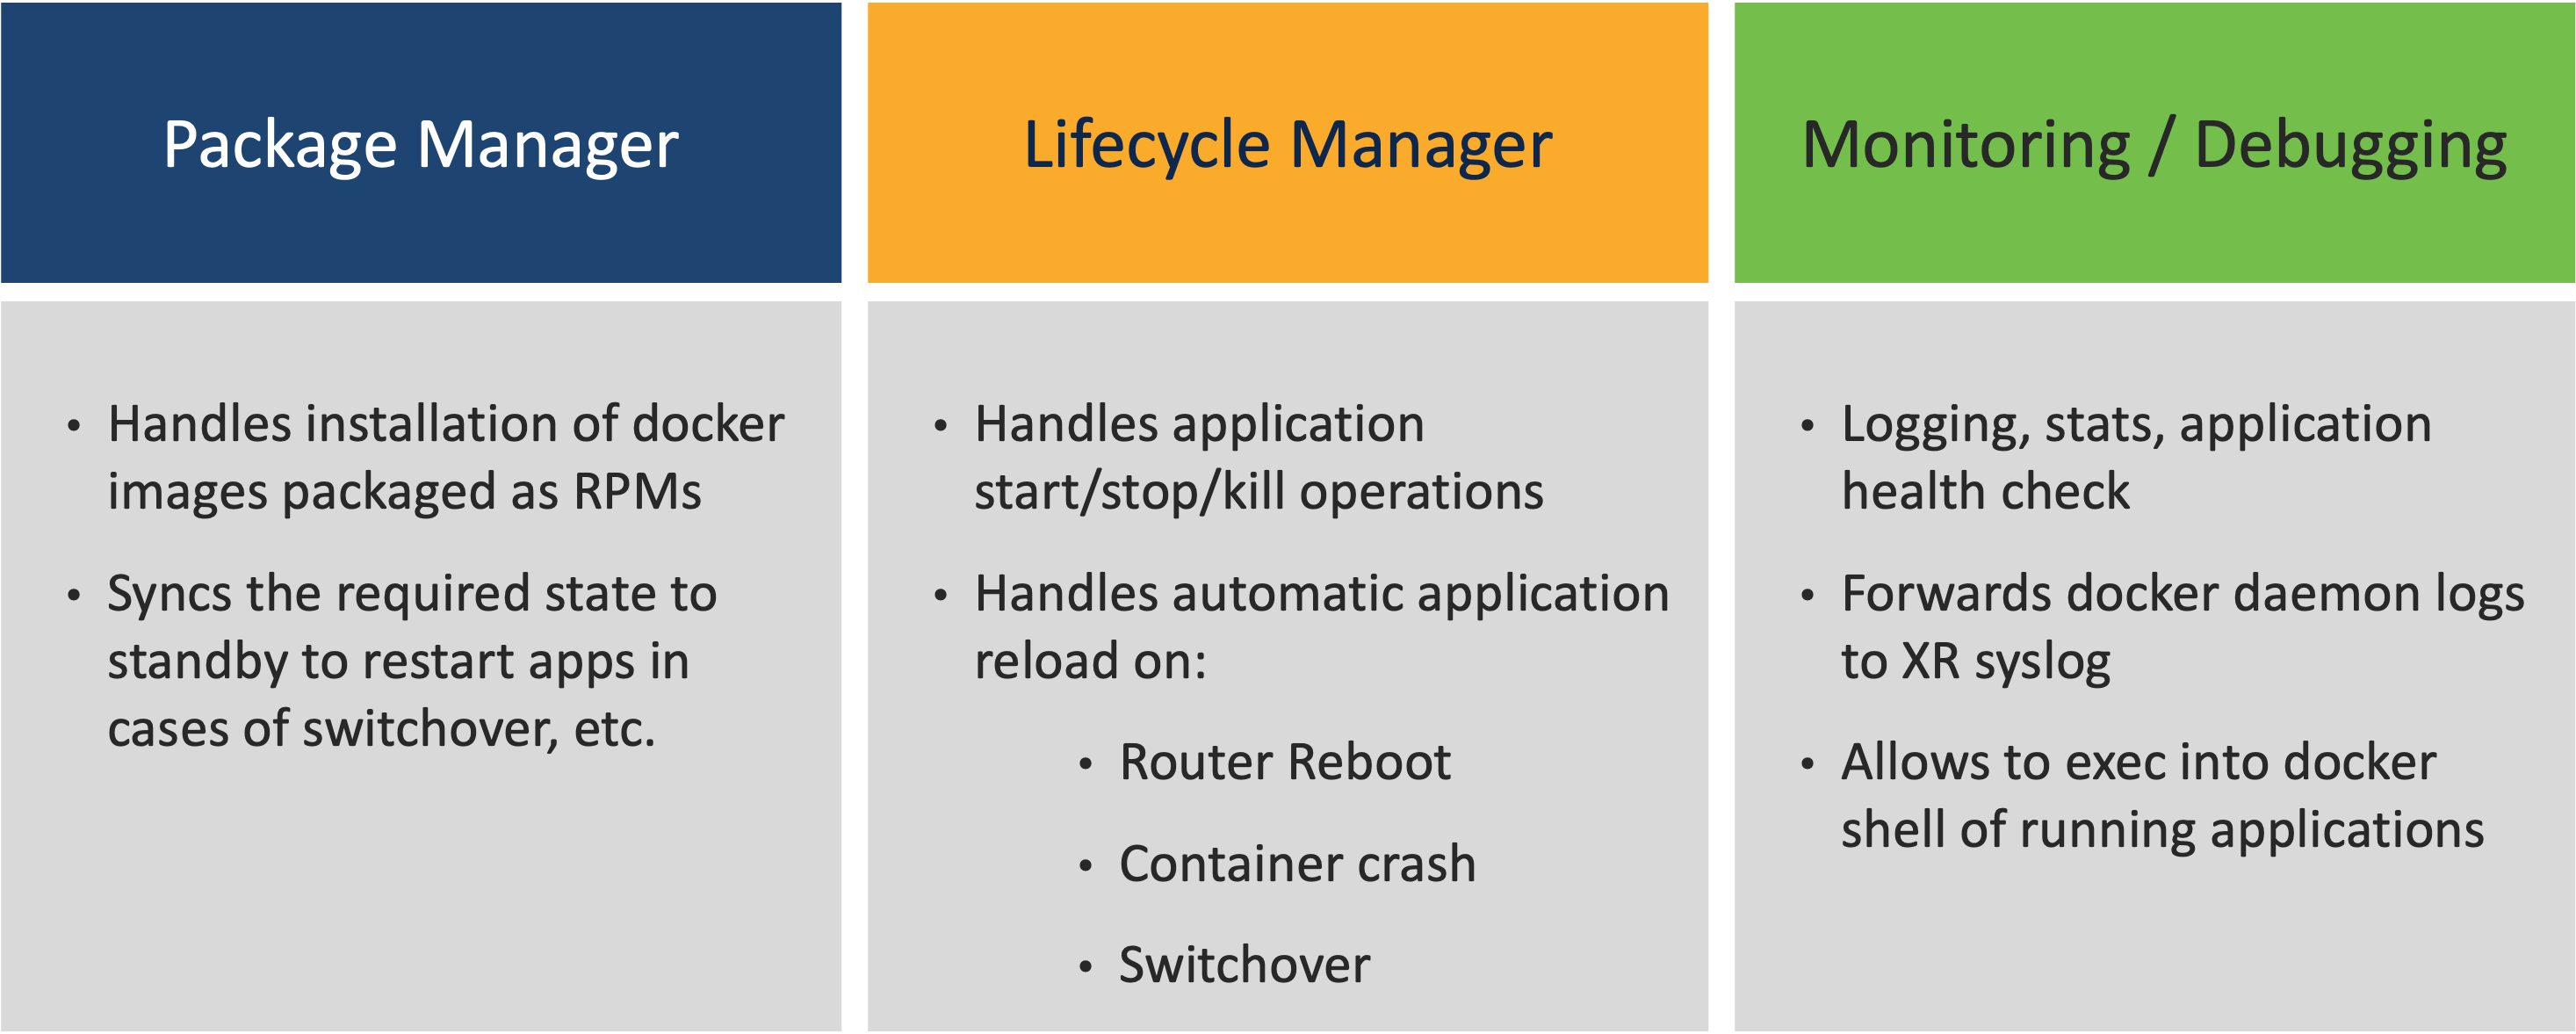
Appmgr: While the docker daemon comes packaged with IOS XR, docker applications can only managed using appmgr. Appmgr allows users to install applications packaged as rpms and then manage their lifecycle using IOS XR CLI and programmable models. We will discuss appmgr features in depth in later sections. A public repository (https://github.com/ios-xr/xr-appmgr-build) contains scripts that package docker images into appmgr supported rpms. We will use these scripts to build appmgr rpms in a later section of this article.
PacketIO: This is the router infrastructure that implements the packet path between TPAs and IOS XR running on the same router. It allows TPAs to leverage XR forwarding to send and receive traffic. A future article in this series will discuss the architecture and features of PacketIO in-depth.
TPA Security
IOS XR comes with built in guardrails to prevent Third Party Applications from interfering with its functions as a Network OS.
- While IOS XR does not limit the number of TPAs that can be run simultaneously, it does restrict the resources available to the docker daemon for the following parameters:
- CPU: ¼ CPU per core available in the platform.
- RAM: 1G Maximum
- Disk is limited by the partition size which varies by platform. Can be checked by executing “run df -h” and looking at the size of the /misc/app_host or /var/lib/docker mounts.
All packets to and from the application are policed by the XR control protection, LPTS. Read this blog to learn more about XR’s LPTS Introduction to NCS 55XX and NCS 5xx LPTS
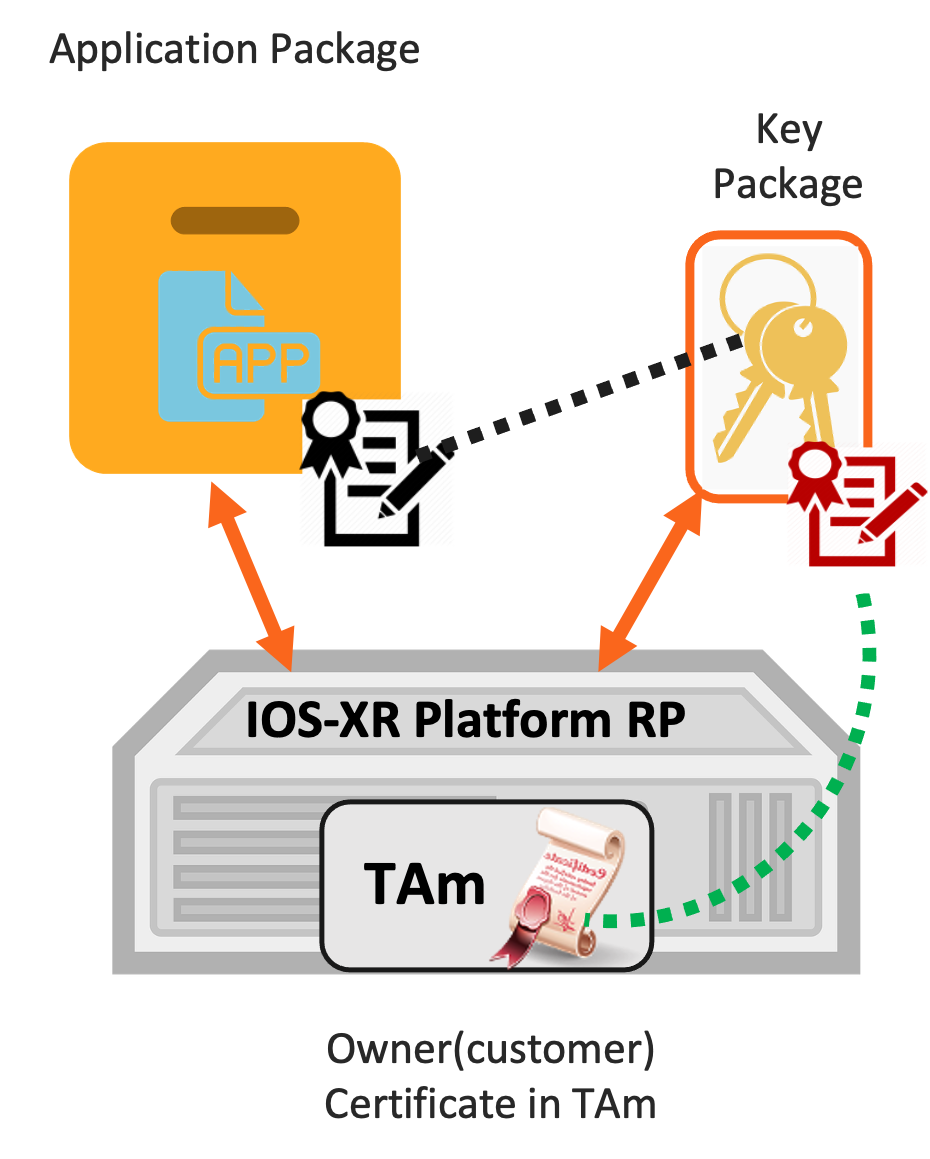
- Signed Applications are supported on IOS XR. Users can sign their own applications by onboarding Owner Certificate (OC) using Ownership Voucher based workflows described in RFC 8366. After onboarding an Owner Certificate, users can sign applications with GPG keys based on the Owner Certificate which can then be verified while installing the application on the router.
IOS XR appmgr
Command reference:
Application Install
appmgr
|- package
|    |- install <rpm>
|    |- uninstall <rpm>
<rpm>is a path to the application rpm.- Install: Installs the rpm and the application is ready to be configured.
- Uninstall: Uninstalls the application that was un-configured.
- From a docker standpoint, executing appmgr install will load the docker image from the rpm into the local repository. Executing appmgr uninstall will remove the docker image from the local repository.
Application Activation
configure

appmgr
|- application <name>
|    |- type <type>
|    |- source <source>
|    |- run-opts <run-options>
|    |- run-cmd <cmd>

commit
- Type: Type of app [docker, native]
- Source: app source file [docker image name]
- Run-opts: docker run options [docker only] – Not all docker run opts are supported
- Docker-run-cmd – Command to run in container [docker only]
- Once committed the container will be started by the App Manager
Application Action
appmgr
|- application
|    |- copy
|    |- start
|    |- stop
|    |- kill
|    |- exec
- Start: Start an app [Docker equivalent: docker start]
- Stop: Stop an app [Docker equivalent: docker stop]
- Kill: Kill an app [Docker equivalent: docker rm]
- Exec: run command in container [Docker equivalent: docker exec]
- Copy: copy files to/from container
Application Monitoring
 show appmgr
  |- application-table
  |- application name <name>
  |    |- info [summary|detail]
  |    |- stats
  |    |- logs
  |- source-table
  |- source name <name>
- Application-table: Shows a consolidated view of all applications and their status
- Application info: Show application status and information
- Application stats: Show app stats [Docker equivalent: docker stats/top]
- Application logs: Show app logs [Docker equivalent: docker logs/journalctl]
- Source table: Show information about available sources.
Building your application
Let us try building a docker application as a XR appmgr support rpm package.
To get started, clone the appmgr-build repository on your development environment.
git clone https://github.com/ios-xr/xr-appmgr-build
The cloned directory structure should look like:
xr-appmgr-build
├── appmgr_build
├── clean.sh
├── docker
│   ├── build_rpm.sh
│   ├── Centos.Dockerfile
│   └── WRL7.Dockerfile
├── examples
│   └── alpine
│       ├── alpine.tar.gz
│       ├── build.yaml
│       ├── config
│       │   └── config.json
│       └── data
│           └── certs
│               ├── cert.pem
│               ├── client.key
│               ├── server.crt
│               └── server.key
├── LICENSE
├── Makefile
├── README.md
└── release_configs
    ├── eXR_7.3.1.ini
    └── ThinXR_7.3.15.ini
Inside the xr-appmgr-build directory, let us create a directory specific to our docker application (my-app). In the my-app directory, we need to have the following:
- build.yaml file that will specify the build parameters for our application.
- A tarball of the docker image
- [Optional] Config directory containing any configuration files for our application.
- [Optional] Data directory containing any other files for our application.
For our example, we will not set any config or data directories.
cisco@cisco:~/demo$ cd xr-appmgr-build/
cisco@cisco:~/demo/xr-appmgr-build$ mkdir my-app
cisco@cisco:~/demo/xr-appmgr-build$ cd my-app/
cisco@cisco:~/demo/xr-appmgr-build/my-app$ touch build.yaml
cisco@cisco:~/demo/xr-appmgr-build/my-app$ docker pull my-app
Using default tag: latest
latest: Pulling from library/my-app
Digest: sha256:aa0cc8055b82dc2509bed2e19b275c8f463506616377219d9642221ab53cf9fe
Status: Image is up to date for my-app:latest
cisco@cisco:~/demo/xr-appmgr-build/my-app$ docker save my-app:latest > my-app.tar
cisco@cisco:~/demo/xr-appmgr-build/my-app$ ls
build.yaml  my-app.tar
cisco@cisco:~/demo/xr-appmgr-build/my-app$
The build.yaml contains parameters that specify how to build the rpm.
name and version are used to tag the RPM we are building.
Release should correspond to an entry in the release_configs directory. Currently, ThinXR_7.3.15 corresponds to LNT platforms and eXR_7.3.1 corresponds to eXR platforms.
We must specify the name and path to the docker tarball under sources.
[Optional] We specify the name and path to the config directory and data directory under config-dir and data-dir respectively. We are not using data or config directories in this example.
Example build.yaml:
packages:
- name: "my-app"
  release: "ThinXR_7.3.15"
  version: "0.1.0"
  sources:
    - name: my-app
      file: my-app/my-app.tar
Once the steps above are completed, we can use the appmgr_build script to build the rpm. We run the script using the following command:
./appmgr_build -b my-app/build.yaml
In general:
./appmgr_build -b <path to target build.yaml>
Once the build process is complete, the rpm should be present in the /RPMS/x86_64/ directory. After building the application, we can copy it to the router using the copy command. Copy supports the following external source:
  ftp:            Copy from ftp: file system
  http:           Copy from http: file system
  https:          Copy from https: file system
  scp:            Copy from scp: file system
  sftp:           Copy from sftp: file system
  tftp:           Copy from tftp: file system
For example: copy https://<web-server>/<path-to-rpm>/ /misc/disk1/
Installing and running your application
Now that we have learned how to package docker applications as appmgr rpms, let us try installing and running rpm packages using appmgr.
After copying the rpm onto the router, we can install it using appmgr CLI commands.
appmgr package install rpm /misc/disk1/my-app-0.1.0-ThinXR_7.3.15.x86_64.rpm
We can verify if the packaged was installed using:
RP/0/RP0/CPU0:8201#show appmgr packages installed
Thu Jan 19 15:59:17.243 PST
Package
------------------------------------------------------------
my-app-0.1.0-ThinXR_7.3.15.x86_64.rpm
Once installed, the application can be activated using
appmgr application my-app activate type docker source hello-world docker-run-opts “<YOUR DOCKER RUN OPTS>”
Running applications can be viewed in the application table:
RP/0/RP0/CPU0:8201#show appmgr application-table
Thu Jan 19 16:00:29.878 PST
Name        Type   Config State Status
----------- ------ ------------ --------------------------------
my-app Docker  Activated   Running
bgpfs2acl_1 Docker  Activated   Exited (137) 4 months ago
bgpfs2acl_2 Docker  Activated   Exited (2) 2 months ago
Leave a Comment