
XR Toolbox, Part 2 : Bootstrap XR configuration with Vagrant
Check out Part 1 of the XR toolbox series: IOS-XR Vagrant quick-start.
Introduction
The IOS-XR Vagrant Quick Start guide showcases how a user can get started with an IOS-XR vagrant box.
This tutorial will extend the quick-start guide to showcase how one can apply a node-specific configuration to an XR vagrant instance during boot-up itself.
Make sure you take a look at the quick-start guide before proceeding.
Bear in mind that the IOS-XR vagrant box is published without a need for any custom plugins. We thought about it and felt that masking the core functionality of the router with Vagrant workflows could prevent us from showcasing some core functionalities of IOS-XR, namely :
- Day 0: ZTP helpers and shell/bash based automation
- Day 1: automation techniques based off YANG models
- Day 2: Streaming Telemetry and application-hosting
This tutorial invariably ends up using the new shell/bash based automation techniques that have been introduced as part of the Zero Touch provisioning (ZTP) functionality in IOS-XR.
Pre-requisite
Meet the pre-requisites specified in the IOS-XR Vagrant Quick Start guide: Pre-requisites
Clone the following repository: https://github.com/ios-xr/vagrant-xrdocs, before we start.
cd ~/
git clone https://github.com/ios-xr/vagrant-xrdocs.git
cd vagrant-xrdocs/
You will notice a couple of directories. We will utilize the single_node_bootstrap directory in this tutorial.
AKSHSHAR-M-K0DS:vagrant-xrdocs akshshar$ pwd
/Users/akshshar/vagrant-xrdocs
AKSHSHAR-M-K0DS:vagrant-xrdocs akshshar$ ls single_node_bootstrap/
Vagrantfile	configs		scripts
AKSHSHAR-M-K0DS:vagrant-xrdocs akshshar$
Bootstrap Configuration: Shell Provisioner
The concept is simple: We’ll use the Vagrant shell provisioner to apply a bootstrap configuration to an XR instance when we issue a vagrant up.
All we need is a shell provisioner section in the Vagrantfile for each node:
 #Source a config file and apply it to XR

 config.vm.provision "file", source: "configs/rtr_config", destination: "/home/vagrant/rtr_config"

 config.vm.provision "shell" do |s|
   s.path =  "scripts/apply_config.sh"
   s.args = ["/home/vagrant/rtr_config"]
 end
We will look at a complete Vagrantfile in a bit. But let’s desconstruct the above piece of code.
Transfer a Configuration file to XR bash
config.vm.provision "file", source: "configs/rtr_config", destination: "/home/vagrant/rtr_config"
The above line uses the Vagrant “file” provisioner to transfer a file from the host (your laptop) to the XR linux shell (bash).
The root of the source directory is the working directory for your vagrant instance. Hence, the rtr_config file is located in the configs directory.
Use a Shell script to Apply XR Config
config.vm.provision "shell" do |s|
   s.path =  "scripts/apply_config.sh"
   s.args = ["/home/vagrant/rtr_config"]
 end
The shell script will eventually be run on XR bash of the vagrant instance. This script is placed in the scripts directory and is named apply_config.sh.
Further, the script needs the location of the router config file as an argument. This is the destination parameter in the “file” provisioner above.
So, in short, Vagrant copies a config file to the router bash, and then runs a shell script on the router bash to apply the config file that was copied!
Single node bootstrap
To meet the above requirements, you will need a directory structure as laid out under ~/vagrant-xrdocs/single_node_bootstrap:
AKSHSHAR-M-K0DS:single_node_bootstrap akshshar$ pwd
/Users/akshshar/vagrant-xrdocs/single_node_bootstrap
AKSHSHAR-M-K0DS:single_node_bootstrap akshshar$ tree ./
./
├── Vagrantfile
├── configs
│   └── rtr_config
└── scripts
    └── apply_config.sh

2 directories, 3 files
We will stick to the single_node_bootstrap directory throughout this section.
Configuration File
Let’s assume we’re applying a simple XR config that configures the grpc server on port 57891. This will be the contents of our configs/rtr_config file
This configuration will be an addendum to the pre-existing configuration on the vagrant instance.
AKSHSHAR-M-K0DS:iosxrv akshshar$ cat configs/rtr_config
!! XR configuration
!
grpc
  port 57891
!
end
Bootstrap script
The shell script to apply the configuration will run on XR bash. The following new shell commands are made available to enable this:
- xrcmd: This command allows a user to run “exec” commands on XR CLI from the shell. For eg. “show run”, “show version” etc.
- xrapply: This command allows a user to apply (append) a config file to the existing configuration.
- xrapply_string: This command can be used to apply a config directly using a single inline string. For eg.
xrapply_string "interface Gig0/0/0/0\n ip address 1.1.1.2/24 \n no shutdown"
Only the root user is allowed to run the above commands as a good security practice. Unless specified, Vagrant will always escalate the privilege to run the shell provisioner script as root.
Our shell script will look something like this:
AKSHSHAR-M-K0DS:iosxrv akshshar$ cat scripts/apply_config.sh
#!/bin/bash

## Source ztp_helper.sh to get the xrapply and xrcmd functions.
source /pkg/bin/ztp_helper.sh

function configure_xr()
{
   ## Apply a blind config
   xrapply $1
   if [ $? -ne 0 ]; then
       echo "xrapply failed to run"
   fi
   xrcmd "show config failed" > /home/vagrant/config_failed_check
}

## The location of the config file is an argument to the script
config_file=$1

## Call the configure_xr() function to use xrapply and xrcmd in parallel
configure_xr $config_file

## Check if there was an error during config application
grep -q "ERROR" /home/vagrant/config_failed_check

## Condition based on the result of grep ($?)
if [ $? -ne 0 ]; then
    echo "Configuration was successful!"
    echo "Last applied configuration was:"
    xrcmd "show configuration commit changes last 1"
else
    echo "Configuration Failed. Check /home/vagrant/config_failed on the router for logs"
    xrcmd "show configuration failed" > /home/vagrant/config_failed
    exit 1
fi
Few things to note in the above script:
source /pkg/bin/ztp_helper.shis necessary for thexrapply,xrcmdcommands to be available.- There are comments in the script to help understand the steps taken. Essentially, the shell script blindly applies the config file specified as an argument ($1) and then checks to see if there was an error during config application.
Vagrantfile
Take a look at the Vagrantfile in the same directory. The shell provisioner code has been added:
# -*- mode: ruby -*-
# vi: set ft=ruby :

# All Vagrant configuration is done below. The "2" in Vagrant.configure
# configures the configuration version (we support older styles for
# backwards compatibility). Please don't change it unless you know what
# you're doing.

Vagrant.configure(2) do |config|

  config.vm.box = "IOS-XRv"

  #Source a config file and apply it to XR

  config.vm.provision "file", source: "configs/rtr_config", destination: "/home/vagrant/rtr_config"

  config.vm.provision "shell" do |s|
    s.path =  "scripts/apply_config.sh"
    s.args = ["/home/vagrant/rtr_config"]
  end
end
Bootstrap in action!
Assuming that the box (IOS-XRv) is already in the vagrant box list as shown in the IOS-XR Vagrant Quick Start guide, just issue a vagrant up to see the magic happen:
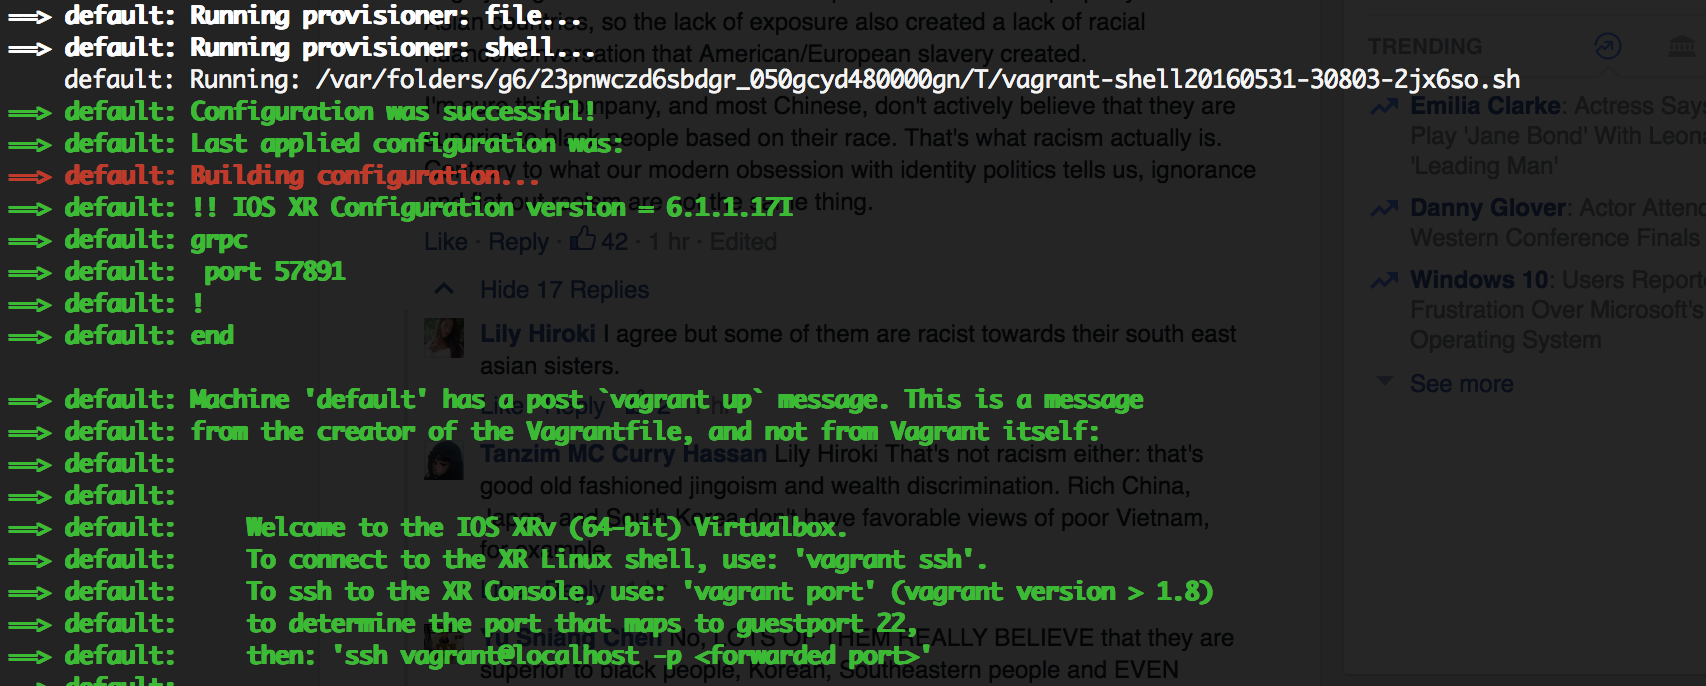
Let’s get into the XR CLI to check that it worked:
AKSHSHAR-M-K0DS:single_node_bootstrap akshshar$ vagrant port
The forwarded ports for the machine are listed below. Please note that
these values may differ from values configured in the Vagrantfile if the
provider supports automatic port collision detection and resolution.

    22 (guest) => 2223 (host)
 57722 (guest) => 2222 (host)
AKSHSHAR-M-K0DS:single_node_bootstrap akshshar$
AKSHSHAR-M-K0DS:single_node_bootstrap akshshar$ ssh -p 2223 vagrant@localhost
vagrant@localhost's password:


RP/0/RP0/CPU0:ios#
RP/0/RP0/CPU0:ios#show  running-config grpc
Tue May 31 16:59:44.581 UTC
grpc
 port 57891
!

RP/0/RP0/CPU0:ios#show configuration commit changes last 1
Tue May 31 17:02:45.770 UTC
Building configuration...
!! IOS XR Configuration version = 6.1.1.17I
grpc
 port 57891
!
end

RP/0/RP0/CPU0:ios#
It worked! The config was applied as part of the vagrant up process.
Head over to Part 3 of the XR Toolbox series where we bring up a typical app-development topology —> App Development Topology.
Leave a Comment