
Validate the intent of network config changes
Introduction
The goal of this tutorial is not only to demonstrate how to config an IOS XR device using the gRPC framework and OpenConfig YANG models, but also validate the changes by subscribing to a telemetry stream from the device.
We will use a gRPC library for Cisco IOS XR written in Go to:
1) Submit network config changes to the devices using OpenConfig YANG models.
2) Request the running configuration on the targets to validate the change submitted was actually applied.
3) Subscribe to a telemetry stream to track status changes.
In this oportunity, we will setup a BGP session between two devices with gRPC and leverage Streaming Telemetry (gRPC as well) to track BGP Neighbor status.
This tutorial assumes that you have gone through the previous gRPC tutorial. If you haven’t checked it out, then you can do so here:
Prerequisites
We will use this Vagrantfile to setup and run the topology as shown below:
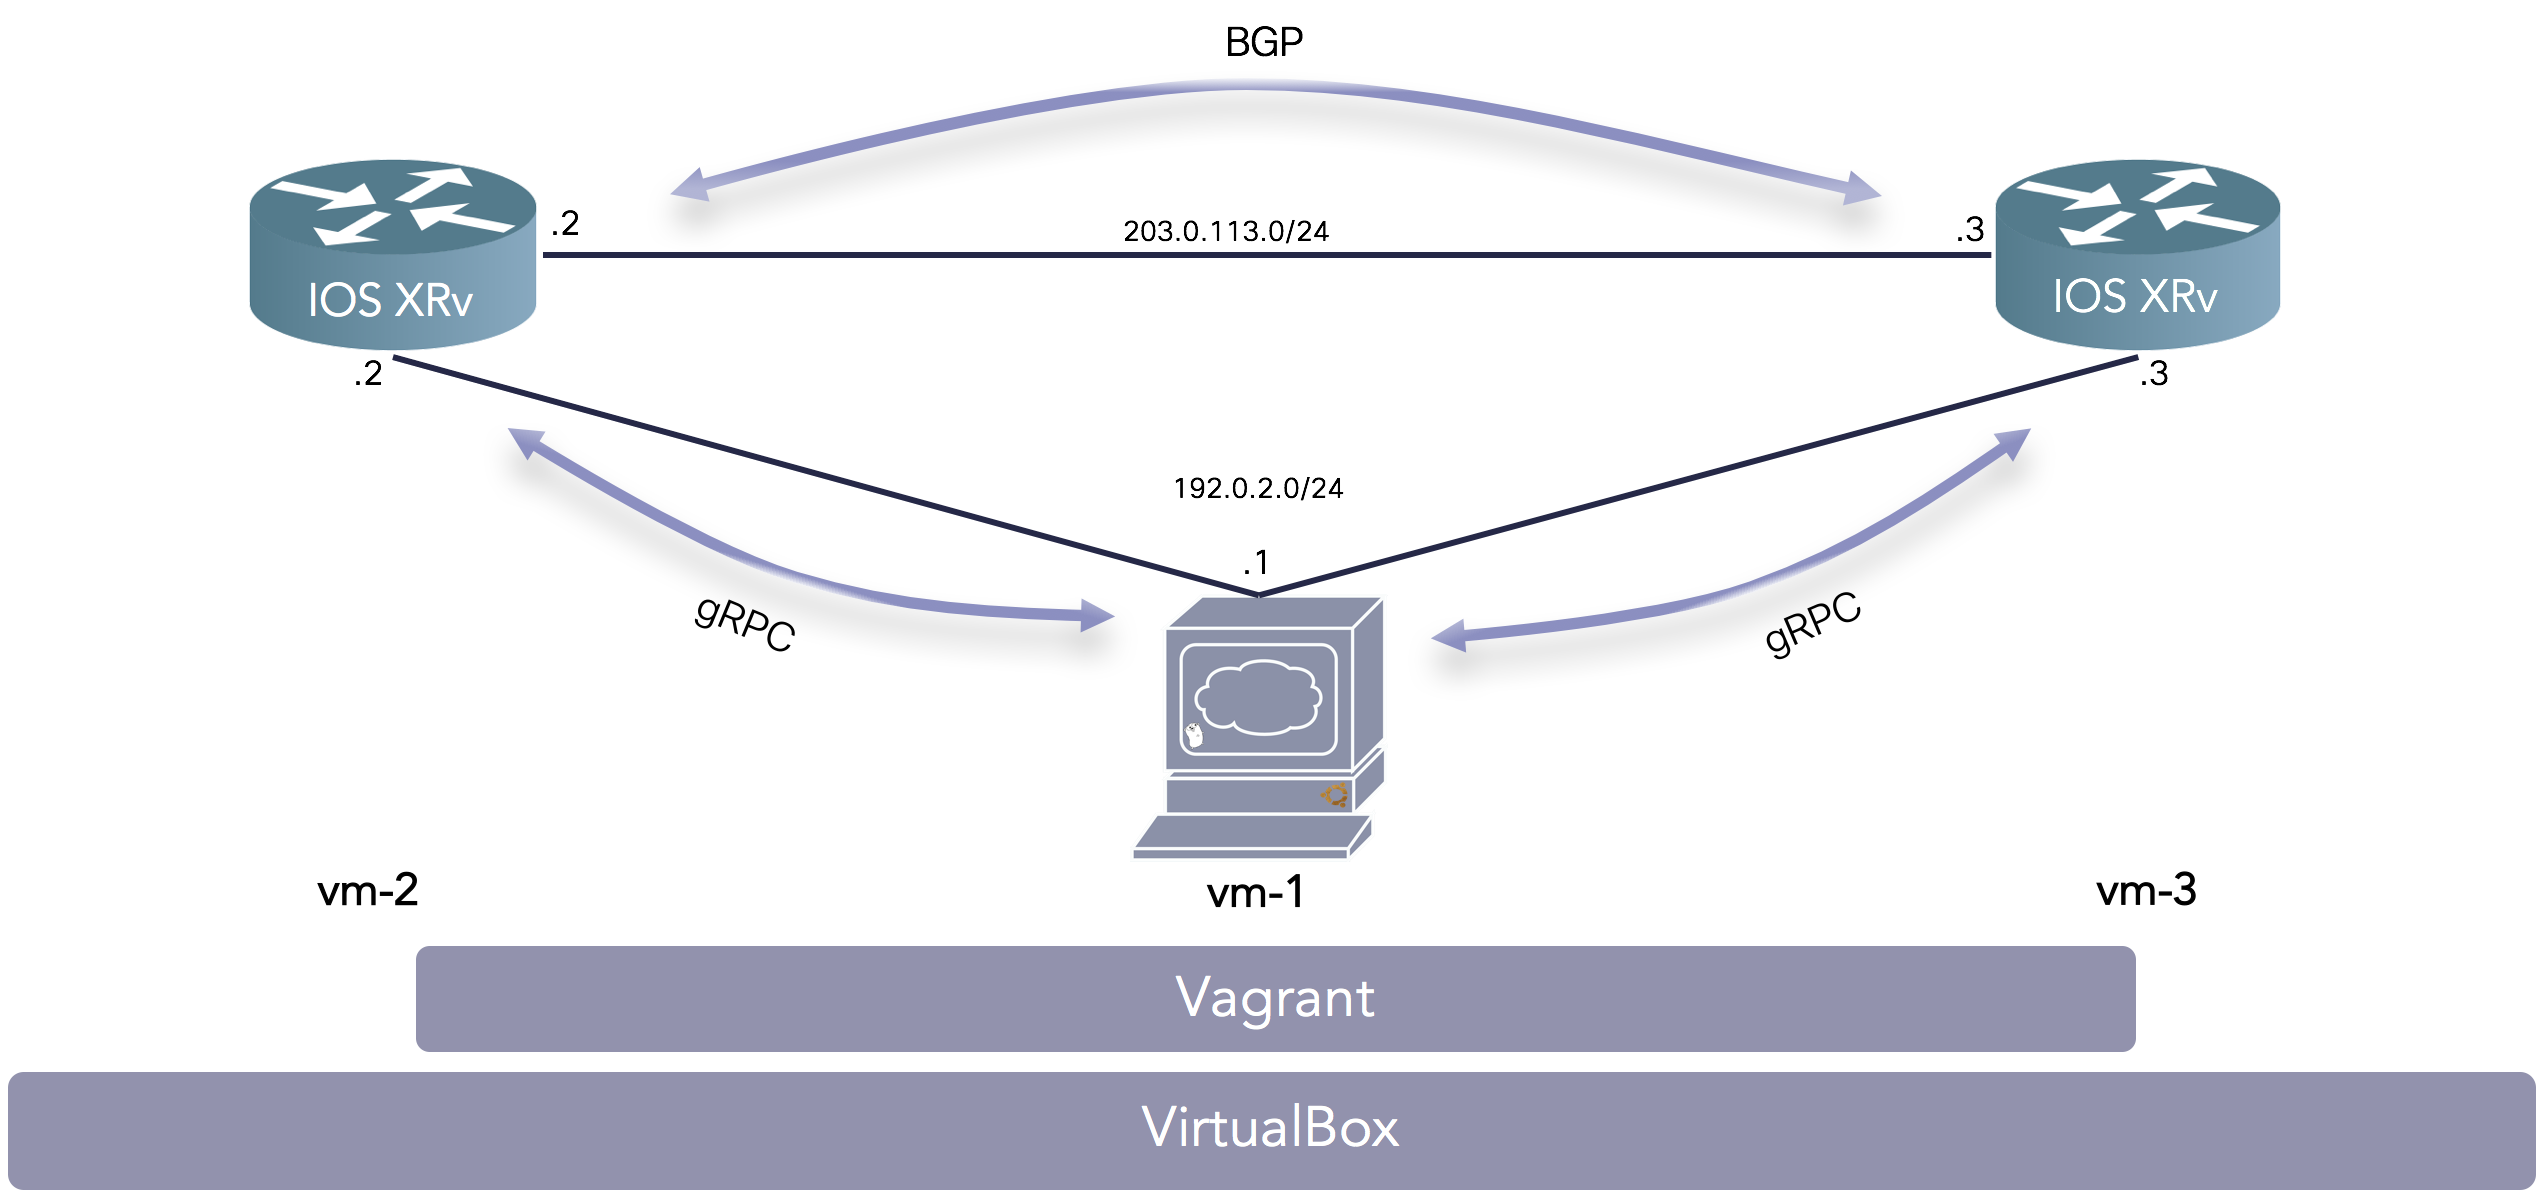
This time, we will automate the installation of Go and basic configuration of the routers to enable connectivity between them and the Ubuntu VM.
To make this possible, we will use all the files in this folder. You need to have Vagrant and VirtualBox installed.
Request access to the IOS XRv Vagrant box by filling up the form here. This example was run with IOS XR version 6.1.2.
Setup the topology
You can either manually download the files in this folder or clone the repo: git clone https://github.com/nleiva/xrgrpc.git.
If you cloned the repo, you need to drill down to the files: cd xrgrpc/example/configvalidate4. Either if you did this or downloaded the files to another folder, you simply need to run vagrant up where the files are.
This process might take several minutes, so feel free to multitask.
Copy the public credential file from the routers
In order to establish secure gRPC connections, we need to get this file from the target.
Login to the first router (password: vagrant) and copy the content of ems.pem.
ssh -p 2223 vagrant@localhost
bash cat /misc/config/grpc/ems.pem
exit
Exit the router and login to the Ubuntu VM to update the following file in the repo with the contents copied.
vagrant ssh vm-1
vim $GOPATH/src/github.com/nleiva/xrgrpc/example/configvalidate4/ems1.pem
exit
Repeat this process for the second router. Notice the destination port and destination files are different.
ssh -p 2202 vagrant@localhost
bash cat /misc/config/grpc/ems.pem
exit
vagrant ssh vm-1
vim $GOPATH/src/github.com/nleiva/xrgrpc/example/configvalidate4/ems2.pem
exit
You can verify the port to use with vagrant port <vm name> before running ssh -p <port no>
Compile the example
Login to the Ubuntu VM, go to the example location and compile.
vagrant ssh vm-1
cd $GOPATH/src/github.com/nleiva/xrgrpc/example/configvalidate4
go build
That’s it! We are all set to run the example.
Run the example
On the same folder, you just need to do a ./configvalidate4.
$ go build
$ ./configvalidate4
******************************************************************************************

Config merged on 192.0.2.2:57344 -> Request ID: 1000, Response ID: 1000


Config merged on 192.0.2.3:57344 -> Request ID: 1000, Response ID: 1000

******************************************************************************************

BGP Config from 192.0.2.2:57344


{
 "openconfig-bgp:bgp": {
  "global": {
   "config": {
    "as": 64512,
    "router-id": "203.0.113.2"
   },
   "afi-safis": {
    "afi-safi": [
     {
      "afi-safi-name": "openconfig-bgp-types:ipv4-unicast",
      "config": {
       "afi-safi-name": "openconfig-bgp-types:ipv4-unicast",
       "enabled": true
      }
     }
    ]
   }
  },
  "neighbors": {
   "neighbor": [
    {
     "neighbor-address": "203.0.113.3",
     "config": {
      "neighbor-address": "203.0.113.3",
      "peer-as": 64512,
      "description": "iBGP session"
     },
     "afi-safis": {
      "afi-safi": [
       {
        "afi-safi-name": "openconfig-bgp-types:ipv4-unicast",
        "config": {
         "afi-safi-name": "openconfig-bgp-types:ipv4-unicast",
         "enabled": true
        }
       }
      ]
     }
    }
   ]
  }
 }
}

******************************************************************************************

Telemetry from 192.0.2.2:57344

------------------------------------- Time 07:51:55PM -------------------------------------
BGP Neighbor; IP: 203.0.113.3, ASN: 64512, State bgp-st-active

------------------------------------- Time 07:51:57PM -------------------------------------
BGP Neighbor; IP: 203.0.113.3, ASN: 64512, State bgp-st-idle

------------------------------------- Time 07:51:59PM -------------------------------------
BGP Neighbor; IP: 203.0.113.3, ASN: 64512, State bgp-st-idle

------------------------------------- Time 07:52:01PM -------------------------------------
BGP Neighbor; IP: 203.0.113.3, ASN: 64512, State bgp-st-opensent

------------------------------------- Time 07:52:03PM -------------------------------------
BGP Neighbor; IP: 203.0.113.3, ASN: 64512, State bgp-st-estab

------------------------------------- Time 07:52:05PM -------------------------------------
BGP Neighbor; IP: 203.0.113.3, ASN: 64512, State bgp-st-estab

^C
Manually cancelled the session to 192.0.2.2:57344
…Wait!, what did just happend?..
1) We applied a BGP neighbor config to routers 192.0.2.2 and 192.0.2.3, using a template based on the BGP OpenConfig model: bgpoctemplate4.json.
{ "openconfig-bgp:bgp": {
   "global": {
    "config": {
     "as": {{.LocalAs}},
     "router-id": "{{.LocalAddress}}"
    }
   },
   "neighbors": {
    "neighbor": [
     {
      "neighbor-address": "{{.NeighborAddress}}",
      "config": {
       "neighbor-address": "{{.NeighborAddress}}",
       "peer-as": {{.PeerAs}},
       "description": "{{.Description}}"
      }
<snip>
Config merged on 192.0.2.2:57344 -> Request ID: 1000, Response ID: 1000


Config merged on 192.0.2.3:57344 -> Request ID: 1000, Response ID: 1000
2) We request the running configuration on one of the targets to validate it was actually applied.
BGP Config from 192.0.2.2:57344


{
 "openconfig-bgp:bgp": {
  "global": {
   "config": {
    "as": 64512,
    "router-id": "203.0.113.2"
   },
   "afi-safis": {
    "afi-safi": [
     {
      "afi-safi-name": "openconfig-bgp-types:ipv4-unicast",
      "config": {
       "afi-safi-name": "openconfig-bgp-types:ipv4-unicast",
       "enabled": true
<snip>
3) We subscribed to BGP neighbor telemetry stream to track status changes every two seconds. You can see how the session went from active, idle and opensent to established.
Telemetry from 192.0.2.2:57344

------------------------------------- Time 07:51:55PM -------------------------------------
BGP Neighbor; IP: 203.0.113.3, ASN: 64512, State bgp-st-active

------------------------------------- Time 07:51:57PM -------------------------------------
BGP Neighbor; IP: 203.0.113.3, ASN: 64512, State bgp-st-idle

------------------------------------- Time 07:51:59PM -------------------------------------
BGP Neighbor; IP: 203.0.113.3, ASN: 64512, State bgp-st-idle

------------------------------------- Time 07:52:01PM -------------------------------------
BGP Neighbor; IP: 203.0.113.3, ASN: 64512, State bgp-st-opensent

------------------------------------- Time 07:52:03PM -------------------------------------
BGP Neighbor; IP: 203.0.113.3, ASN: 64512, State bgp-st-estab

------------------------------------- Time 07:52:05PM -------------------------------------
BGP Neighbor; IP: 203.0.113.3, ASN: 64512, State bgp-st-estab
A few pointers on the code
We will document a complete walk-through in a following tutorial. Well, if you are impatient like me, you can take a look at other examples documented in the repo in the meantime.
In this example we basically did six things.
1) Manually specify target parameters. We increased the timeout on router1 to be able to listen to the telemetry stream. Remember, we are only using a single connection per device for all the RPC calls.
router1, err := xr.BuildRouter(
	xr.WithUsername("vagrant"),
	xr.WithPassword("vagrant"),
	xr.WithHost("192.0.2.2:57344"),
	xr.WithCert("ems1.pem"),
	xr.WithTimeout(60),
)
if err != nil {
	log.Fatalf("Target parameters for router1 are incorrect: %s", err)
}
2) Define BGP parameters for each device.
neighbor1 := &NeighborConfig{
	LocalAs:         64512,
	PeerAs:          64512,
	Description:     "iBGP session",
	NeighborAddress: "203.0.113.3",
	LocalAddress:    "203.0.113.2",
}
3) Connect to both routers.
conn1, ctx1, err := xr.Connect(*router1)
if err != nil {
	log.Fatalf("Could not setup a client connection to %s, %v", router1.Host, err)
}
defer conn1.Close()
conn2, ctx2, err := xr.Connect(*router2)
if err != nil {
	log.Fatalf("Could not setup a client connection to %s, %v", router2.Host, err)
}
4) Apply the configs to the routers.
ri, err := xr.MergeConfig(ctx1, conn1, buf1.String(), id)
if err != nil {
	log.Fatalf("Failed to config %s: %v\n", router1.Host, err)
} else {
	fmt.Println(line)
	fmt.Printf("\nConfig merged on %s -> Request ID: %v, Response ID: %v\n\n", router1.Host, id, ri)
}
5) Get the BGP config from router1.
id++
output, err := xr.GetConfig(ctx1, conn1, "{\"openconfig-bgp:bgp\": [null]}", id)
if err != nil {
	log.Fatalf("Could not get the config from %s, %v", router1.Host, err)
}
fmt.Printf("\nBGP Config from %s\n\n", router1.Host)
fmt.Printf("\n%s\n", output)
6) Subscribe to the telemetry stream and parse the output.
id++
ch, ech, err := xr.GetSubscription(ctx1, conn1, p, id, e)
if err != nil {
	log.Fatalf("Could not setup Telemetry Subscription: %v\n", err)
}
<snip>
	rasn := nbr.GetRemoteAs()
	state := nbr.GetConnectionState()
	raddr := nbr.GetConnectionRemoteAddress().GetIpv4Address()
	// Debug:
	// fmt.Printf("\n\n%v\n\n\n", hex.Dump(content))
	fmt.Printf("BGP Neighbor; IP: %v, ASN: %v, State %s \n\n", raddr, rasn, state)
Simple, isn’t it?.
This concludes this tutorial/example. Stay tuned for more!.
Some useful links below:
Leave a Comment